Measuring Flare Gas Mass Flow

Industrial Thermal Mass Flow Meter for flare gas applications
Model TA2 Thermal Dispersion
Mass Flow Meter
Courtesy Magnetrol
Industrial processing of fluids often requires the measurement of mass flow. Whether for purposes of process control or regulatory compliance, accurate measurement of fluid mass flow is an important element of industrial processing.

In the oil and gas industry, hydraulic fracturing operations release substantial quantities of natural gas. Gas wells will coincidentally release gas during completion, called flow back. Gas is also a common byproduct of oil wells and a number of other processes unrelated to petroleum production. Some operations lack the equipment and infrastructure to collect the unwanted gas and it is flared off (burned) or vented.

Compliance with state and federal regulations imposes requirements on numerous industry segments to conduct certain measurements of gas quantities flowing to different points of processing, release, or transfer. The regulatory requirements are stringent, and present a challenge to the manufacturers of mass flow measurement instruments and process engineers to achieve a cost effective solution in the face of:
  • Highly Variable Flow Rates - Production can range  from near zero to extreme bursts during upset conditions.
  • Variable Media Temperature - Depth of the gas source, or another factor, can impact temperature
  • Low Process Pressure - The flare headers usually operate near atmospheric pressure
  • Variable Composition - The components and density of the gas can change over time.
  • Difficult Maintenance - Instruments may need to be installed at locations that are hazardous and not easily accessed
The best mass flow measurement solution will effectively accommodate the challenges at each site. Thermal mass flow measurement is one technology that provides a good approach. Examine the paper included below, documenting performance of the TA2 Model manufactured by Magnetrol. Thermal mass flow measuring devices offer cost and other advantages over several competing technologies. 

Share your mass flow measurement challenges with a product application specialist. Combine your process knowledge with their product application expertise to develop the best solution. 

Simple Field Verification of Thermal Mass Flow Meter Calibration

Magnetrol brand industrial thermal mass flow transmitter for measuring mass flow of air and gases
Magnetrol TA2 Thermatel
Thermal Mass Flow Transmitter
Courtesy Magnetrol
In processes that require mass flow measurement of gases or air, thermal dispersion measurement technology is often selected for use. Its direct mass flow measurement and other attributes make this technology a favorable alternative for many applications, including combustion air, compressed air, natural gas, aeration air, vent lines, biogas production, vent lines, hydrogen lines, and more.

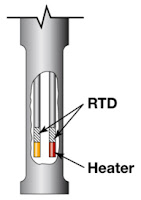
schematic of dual sensors on thermal mass flow meter
Schematic depiction of dual
temperature sensors on a
thermal mass flow meter
Courtesy Magnetrol
As it name implies, a thermal mass flow meter calculates flow by using temperature measurements. Two temperature sensors are inserted into the flow path. One measures the media temperature, the other is heated by a measured power source. With a device factory calibrated for a specific medium, the amount of heat transferred away from the heated sensor can be known, and will be proportional to the mass flow rate of the medium.

Some of the key attributes of thermal mass flow measurement devices:

  • Comparatively moderate initial cost
  • Compatible with measurement of low density gases that cannot be achieved with some other methods
  • Provides direct mass flow measurement
  • Most devices have option for output of process temperature
  • High turndown, with strong signal at low flow rates
  • Field calibration verification
Verifying the proper operation of transmitters of any type can be challenging, especially if performed in the field. The video below demonstrates how the Magnetrol TA2, a thermal mass flow transmitter, can have a calibration verification performed on site with a simple procedure.

The video is short and concise, with some valuable technical knowledge to build your understanding of how this technology works. More detailed information about mass flow measurement, or the specific devices shown in the video, is available from a product application specialist. Share your process measurement and control challenges with them and collaborate to develop the best solution.


Factors For Selecting a Variable Area Flow Meter (Rotameter)

Industrial process variable area flow meters rotameters
Three of many configurations of
variable area flow meters.
Courtesy Brooks Instrument
Industrial processes have many instances where fluid product components, liquid or gaseous, are moving within pipes. Processing is about control, so it follows that an input to the control, measurement, or data logging centers of the facility will answer the question, "How much is flowing through that pipe?".

There are numerous methods employed for quantifying flow in the industrial process measurement and control field, each with particular attributes that may be considered advantageous under  certain operating conditions. All flow measurement methods are indirect, as their actual measurement is of a property that is impacted in a predictable manner by a change in the flow. Flow measurement is an essential element that, combined with other fluid attributes, is used to calculate the total mass of a fluid that has traversed the measurement point.
One time tested method of measuring flow is the variable area meter, also called a rotameter.
Operation of the variable area meter (also referred to as a VA meter) is based upon creating an equilibrium between an upward force, produced by the fluid motion, and a downward force, gravity. The device includes a tapered glass or metal tube that encases a specially shaped float, often referred to as a shaped weight. VA meters must be installed vertically, with the media flowing from the bottom upward, so that the gravitational force necessary for operation is properly aligned with the flow direction. As fluid flows upward through the specially tapered tube, it creates drag on the float contained within the tube, lifting it upward. As the float rises, the free area between the float and the tube wall increases, causing a reduction in the fluid velocity and drag force. For any given flow volume, the flow velocity within the tube will cause the weight to rise until the drag force created by the flow reaches equilibrium with the countervailing force of gravity on the float. Proper design of the tube and the float allow for direct indication of flow volume.

Some of the attributes of variable area meters include:

  • No external power or fuel required for operation
  • Must be installed vertically, with flow entering bottom
  • Meters are characterized to a specific substance, at a specific temperature
  • Operation is stable, with low pressure drop
  • Requires constant gravity for operation
  • Direct local readout of flow rate with meter or scale imprinted on tube
  • Glass tube based unit flow readings require visibility of float through the medium
  • Accuracy is comparatively low for an industrial flow measurement device
  • Generally low maintenance, simple construction, low comparative cost
Brooks Instrument, a world renowned manufacturer of flow, pressure, and level measurement instruments, has produced a concise and compact white paper that summarizes the factors to consider when specifying a VA meter, as well as how each factor impacts operation of the unit. The description is practical and easily understood. It is recommended reading for all process stakeholders to build their flow measurement knowledge.

I have included the paper below. Browse the paper. Contact the flow instrumentation specialists to discuss your application requirements and challenges. Combining your process know-how with their product application knowledge will produce a good solution.


Digital Sensor Technology: An Uptick in Measurement Performance

Electron microscopy image of Yokogawa DPharp silicon resonant sensor
Silicon Resonant Sensor
Courtesy Yokogawa
Industrial process control, as a field of endeavor, is a continuous quest for better, safer, and higher output. The road of progress is paved with new technologies that deliver higher accuracy and reliability in measurement. A recently commercialized advance is the silicon resonant sensor used to measure pressure in industrial process settings. One manufacturer, Yokogawa, applies this technology throughout their DPharp line of differential pressure transmitters, with numerous industrial applications.

Some of the positive attributes of this latest generation of digital pressure sensor include:


  • Simultaneous measurement of differential and static pressure.
  • Superior digital precision
  • No A/D conversion needed
  • High performance 
  • Temperature effects limited to 10 ppm/deg Celsius, yielding highly stable performance
  • High signal to noise ratio
  • Output level increase of more than four times over previous generation piezoresistance silicon sensor

The features all add up to a substantial improvement over previous technology, delivering an incremental step up in measurement performance and confidence. You can quickly boost your understanding of how the sensor technology works by viewing the short video below. To explore how the Yokogawa DPharp sensor equipped transmitters can provide better performance to your process, contact a product specialist and share your process measurement challenges.


Multivariable Transmitter Delivers Mass Flow Rate and More

Process measurement multivariable transmitter
Model EJX 910A Multivariable Transmitter
Courtesy of Yokogawa
Industrial process measurement and control is charged with continually producing better, faster, and cheaper results with increasing levels of safety. For applications requiring mass flow rate measurement of fluids or tank level, a multivariable transmitter has much to offer when it comes to improving outcomes throughout your industrial process operation.

The EJX 910 series from Yokogawa provides the latest generation of digital sensing and processing to provide fast and accurate process measurement of temperature, static pressure, differential pressure, and dynamically compensated mass flow. Flow accuracy as high as +/-1.0% is achievable, along with:

±0.04% Differential Pressure Accuracy
±0.1% Static Pressure Accuracy
±0.9°F External Temperature Accuracy

Some other highlights include:

  • Industry leading fast response time for safe and accurate process control.
  • Yokogawa's specially developed DPharp digital sensor providing simultaneous static and differential pressure measurement, digital accuracy, and no A/D conversion error.
  • LCD display can be rotated in 90 degree increments. External zero adjustment screw and range setting switch enhance field setup.
  • Improved mass flow accuracy of +/- 1% from multivariable operation in one device with dynamic compensation.
  • Signal characterizer for measuring level in irregular shaped tanks.
  • Utilizes industry recognized open communication protocols for easy integration into existing installations.
The manufacturer's white paper, describing precisely how the unit works and how it can be applied, is below. Browse the white paper for some additional detail, but consult with a product specialist to explore how to improve your process measurement and control performance. They have even more information than is provided here which, when combined with your process knowledge, is sure to generate a positive solution to any challenge.